10 Tricks and Hacks to Step Up Your Instagram Stories
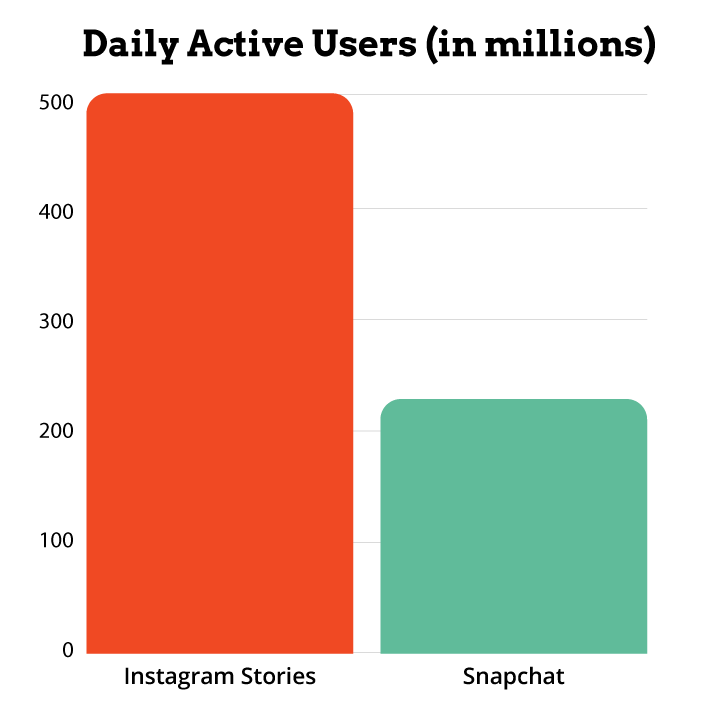
Instagram Stories currently have 500 million daily active users. Half a billion people — around one-and-a-half-Americas — use Instagram Stories every single day!
And Stories keep growing, both in their popularity and in their functionality.
So in this post, we’re going to cover some fun tricks, tips and hacks your can use to take your Instagram stories to the next level.
If you’re not already posting Instagram Stories on a regular basis, check out Episode 3 of my podcast Step Up Your Social and get caught up on what they are and why you should be using them.
That short podcast episode (all episodes of Step Up Your Social are short — ~10 minutes or less) is the 101. This post is the 202.
So let’s dig in!
Instagram Stories: The basics
Instagram Stories launched in August 2016 — by October 2016 they already had 100 million daily active users!
- Stories are ephemeral (they disappear after 24 hours)
- Initially you could only use pictures and videos for Stories that were taken in real time — that’s no longer the case
- By late 2017, Stories started rolling out interactive stickers — they continue to introduce new ones regularly
- In early 2018, they introduced GIF stickers
- As mentioned above, at last reporting, they have 500 million daily active users (on a daily basis, more people use Instragram Stories than use any part of Snapchat)
Want a deeper dive into all the changes and added tools that have been rolled out by Instagram over the years, both for Stories and in their primary feed? Check out my Evolution of Instagram.
But needless to say, Instagram Stories is a vibrant platform and you should definitely be taking advantage of it. Here are some tips, tricks and hacks to get the most out of your Instagram Stories
How to make instagram stories
Several Ways to Create a New Story:
Since Stories have become such a successful part of the platform, Instagram has made it all but impossible to miss them when logged into the app. Users’ Stories are spread out horizontally across the top of the screen, just below the Instagram logo.
Your’s is the first circle on the left. If you don’t have an active story, there will be a blue plus icon over your photo. Tap there to create a new Story. Stories last for 24 hours, so if you have made one in the past day, tapping here will show you your current story.
You can also tap the plus button at the top of your profile or home page and then select Stories from the bottom menu choices.
You can also swipe right anywhere in-app to create a new story. That’s right, this is such a popular tool, Instagram — known for their obsession with simplicity — has given us numerous ways to get to the same place.
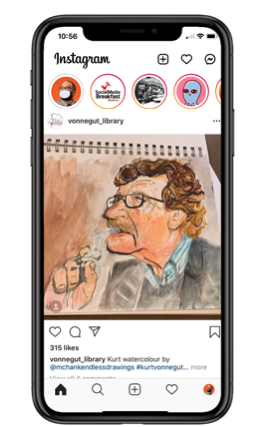
Spice it Up with Filters & Stickers
Adding filters can make an otherwise run-of-the-mill Story feel special. Take for instance this fun shot of my Turkish carpet. With a few quick taps, I can easily add some fun flair.
Once you’re on the Story creation screen, you can see a menu of filters in small circles at the bottom of the display. Tap on one, or swipe through to see different filters applied to your photo or video.
Instagram cycles through filters often, so it’s worth scanning through to see if there’s anything new. This example was taken in June, so there were a bunch of cool Pride filters. Some filters like this one have different variations, which you can see directly above the filter list.
Next, there’s the sticker library. These are meant to be placed over your content, and they’re incredibly diverse — GIFs, location, @mentions, #hashtags, donation requests, and more.
To resize or move a sticker, just use two fingers to pinch or drag it, respectively. If you change your mind, drag it to the bottom of the screen, where a trash can will appear. Poof, it’s gone!
Want a deeper dive into some of these fun sticker types? We’ll cover a few of the specific sticker types in more detail below.
Sticker Quick Tips
-Pinch and drag to resize and move stickers
-Tap on a sticker to change what it does — feel free to experiment!
-Change color of some stickers with a tap
-Add a “sound on” button sticker to let viewers know to turn up the volume
-Explore the deep GIF library to find something that fits your personality or mood
-All text is customizable — from font, alignment, size, color, and more
-Tap the squiggle to draw: change line styles & color, add arrows, erase, and undo/redo
All of these powerful and fun tool are… literally at your fingertips.
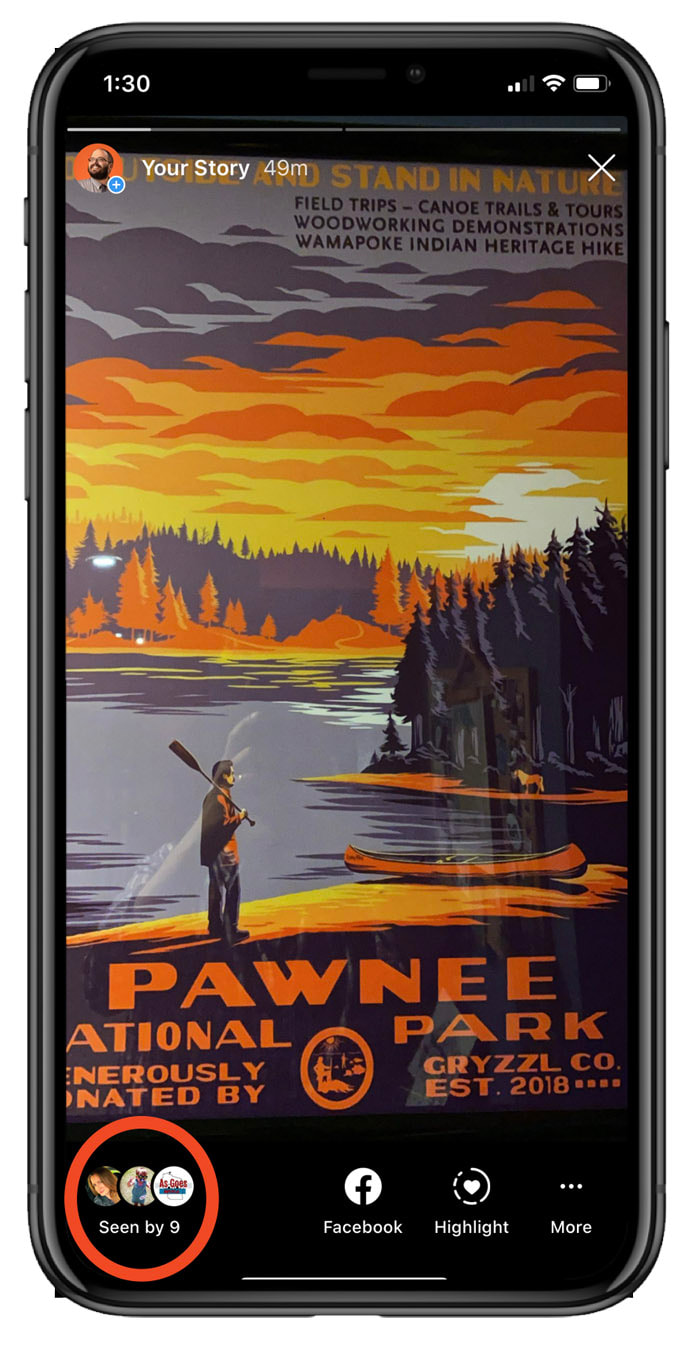
Check Your Analytics
Wondering who watched your Story and which Stories inspired actions on your account? Analytics aren’t quite able to read minds, but they are definitely the next best thing.
During the 24 hours your Story is live, you’ll notice in the bottom-left of the screen “Seen by x,” so you know how many people viewed your story. Tap here to see more detailed analytics of how your Story performed.
On the analytics screen, you can see both who viewed your story and what actions they took (for example, if they skipped your story or watched the next one), Instagram will break that down for you. This can be helpful if you’re posting 20 times a day and want to know what’s connecting with your audience… and what isn’t!
Ok, now that we’re all caught up with the basics, so let’s talk hacks!
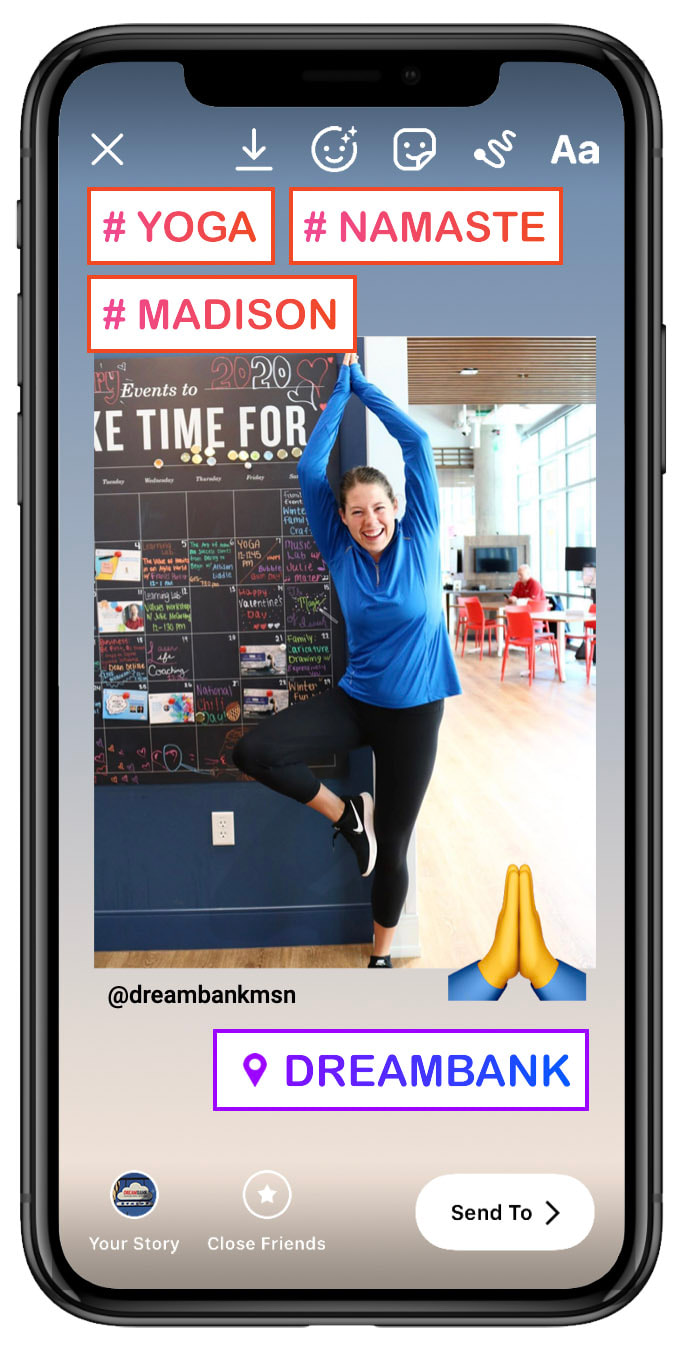
1. Increase Reach With The Location StickeR
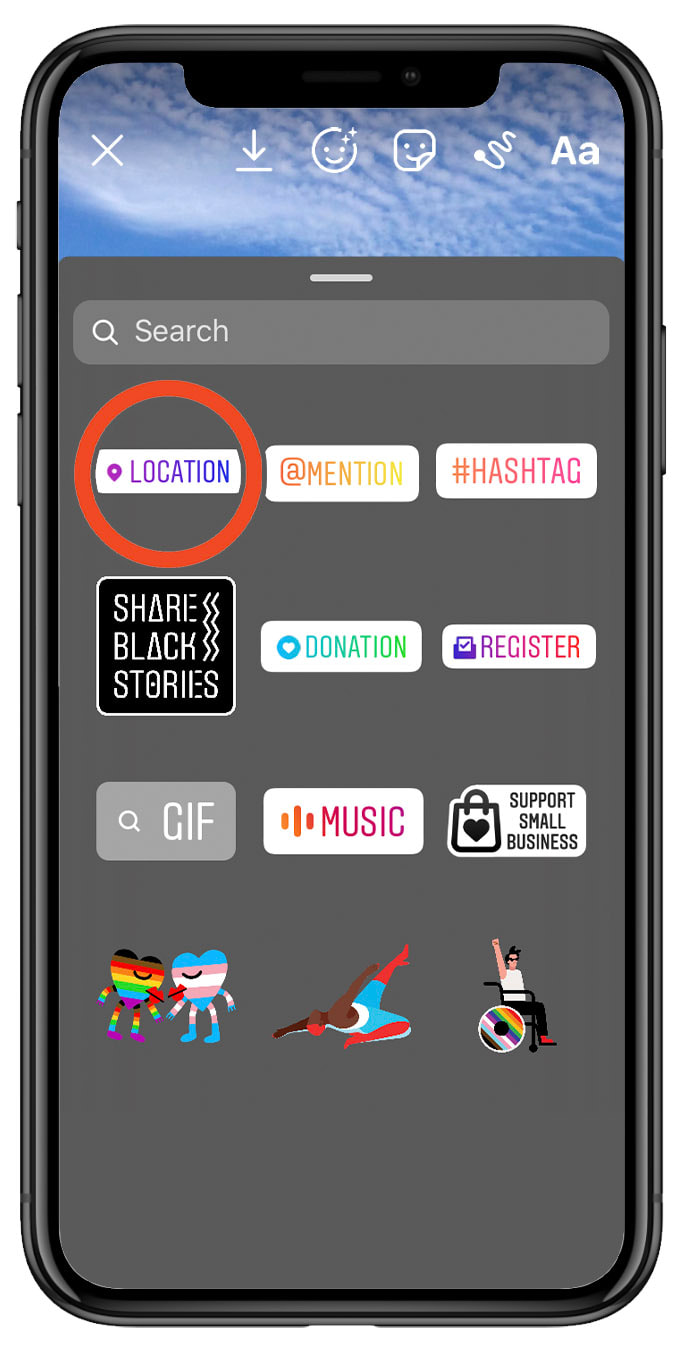
Adding a location sticker doesn’t just let your viewers know where you are, it can also potentially extend your reach beyond your current followers. How you use the location sticker is up to you.
You can be super specific — I’m at the WI capitol.
You can be a bit vague — I’m in Madison, WI.
Or you can be super vague — I’m in WI.
There are 2 reasons to use location stickers:
1) It helps people know where you are. And
2) and this is the important one, it could dramatically increase your Story’s reach.
There’s no surefire way to get one of your Stories added to a public Story* — which will definitely increase your reach — but not tagging your location guarantees that you WON’T be added to the public location’s story.
*What do I mean by public Stories? When you search for any place on Instagram, you’ll find a menu of images tagged in that location. You’ll also find public Stories that Instagram is highlighting to give a fuller peak at the spot you are checking out.
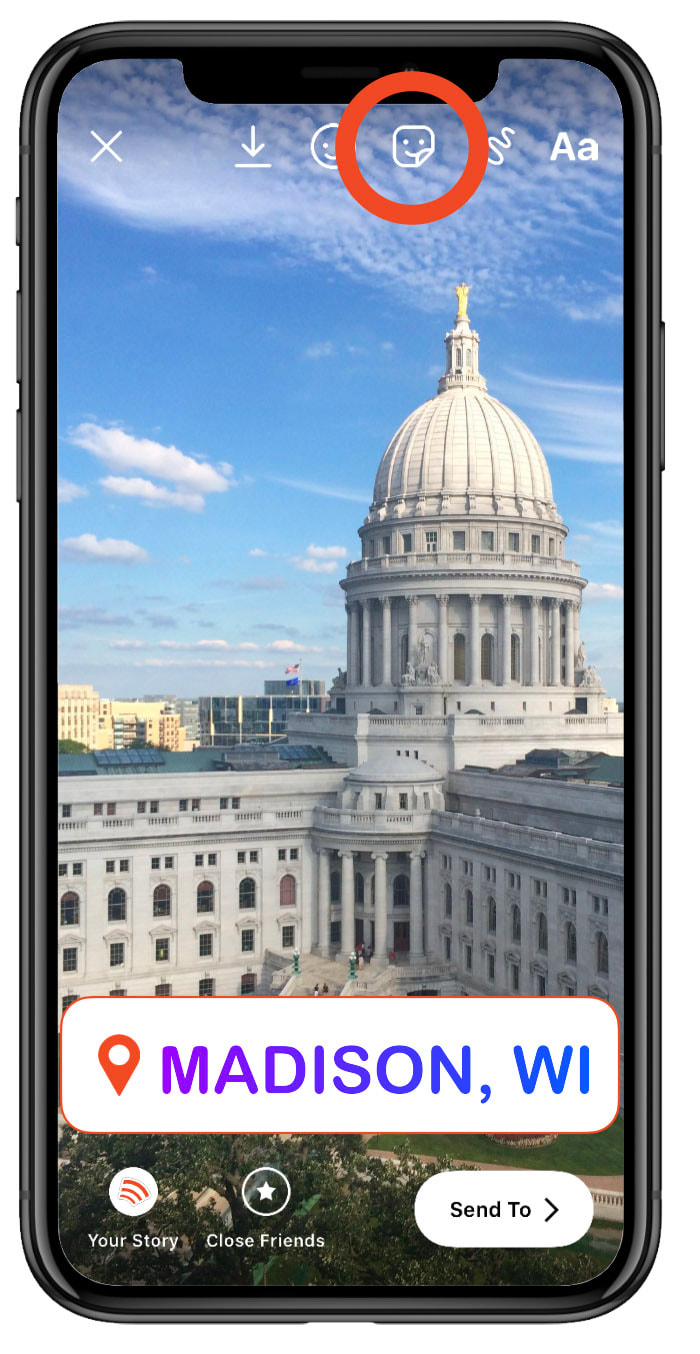
And here’s something cool: Instagram is smart enough to know that the WI Capitol is in Madison and that Madison is in WI. So it’s possible you’ll wind up in the public Stories for all 3 of those places. Which is the main reason why specific location tagging is better than general location tagging. But any location tagging is better than none!
Two quick notes on this — 1) not every story should be tagged by location. If you’re sharing a screenshot of one of your tweets, or posting a Game of Thrones meme that got you laughing, it’s okay to skip the location. And 2) — and this is a big one — you don’t actually have to be at a location to tag yourself there. Now of course I’m not telling you to lie to your audience. In fact I’m straight up telling you to NEVER lie to your audience. But if you took a bunch of pictures at an event last night and you we’re too busy to share them to your Stories in real time, you can post them the next day, and tag the location after the fact. Just search for the location within the search bar, select it, and voila. You’re tagged.
You can then move that sticker around, make it bigger or smaller, or tap it to get different color formatting to better fit the feel of your story.
2. Increase Reach With Hashtags
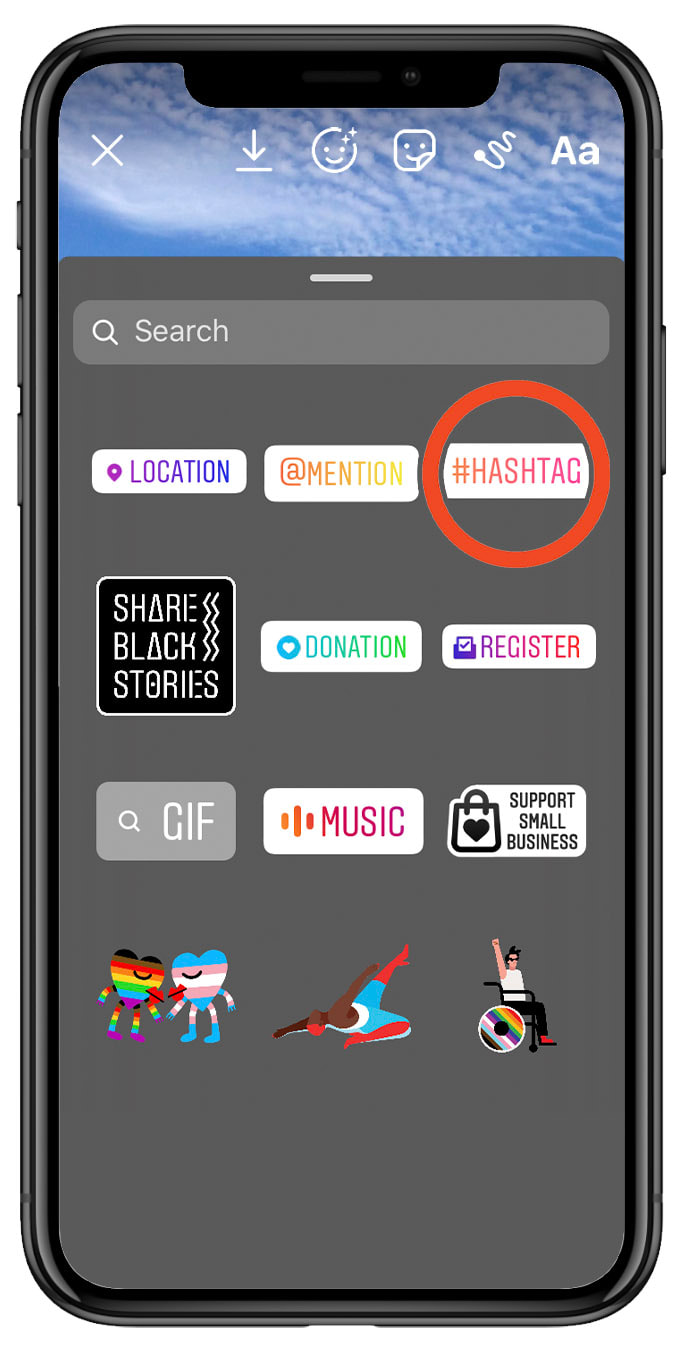
There’s a location sticker. There’s also a hashtag sticker. Use it! Just like you might be added to a public location’s Story when using the location sticker — thus increasing your potential reach — using a hashtag sets you up to potentially be added to a public hashtag’s Story.
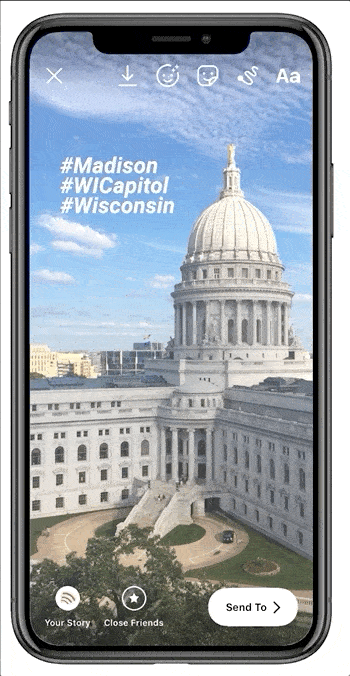
Now on a general Instagram post, you can use up to 30 hashtags. Stories won’t let you go that far, but it will allow you to use up to 10 hashtags. The more hashtags you use, the better chance you have of getting added to public Stories.
You can only use the hashtag sticker once in a Story. But if it makes sense for you to add more, just pop on over to your text and start typing out relevant hashtags.
IF IF IF you are going to do this — and of course you don’t have to add 10 #s in every post — consider stacking and then hiding them, so that it doesn’t make your Story look… gaudy.
Try this:
Create each hashtag as a new piece of text, meaning that instead of just hitting space between tags, you hit done typing out tag one, and then start new text for tag number 2 and so on.
Then, stack them. Literally put them all on top of each other. Which will look awful. But fear not. Once you’ve got your hashtags stacked, head back to your stickers and find yourself a sticker or GIF to stick on top of them. Then no one will see them except Instagram… which in this case is the only one who really matters!
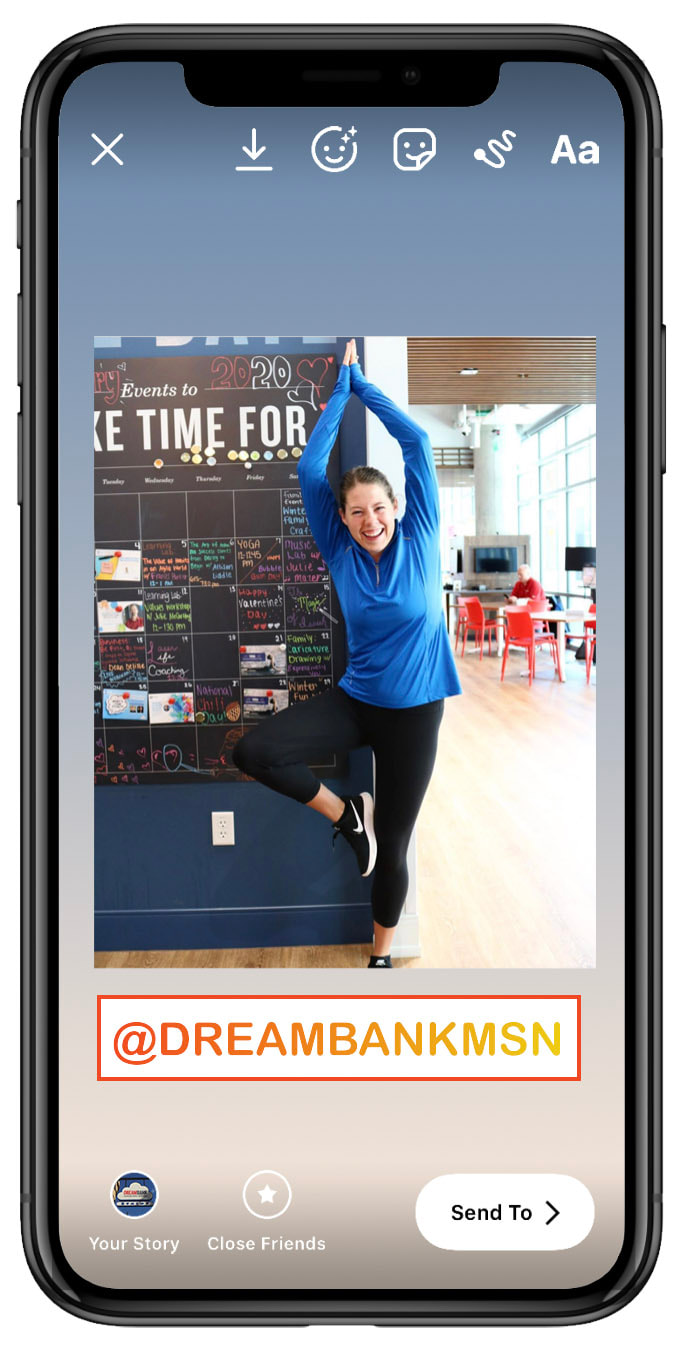
3. Increase Reach With The Mention Sticker
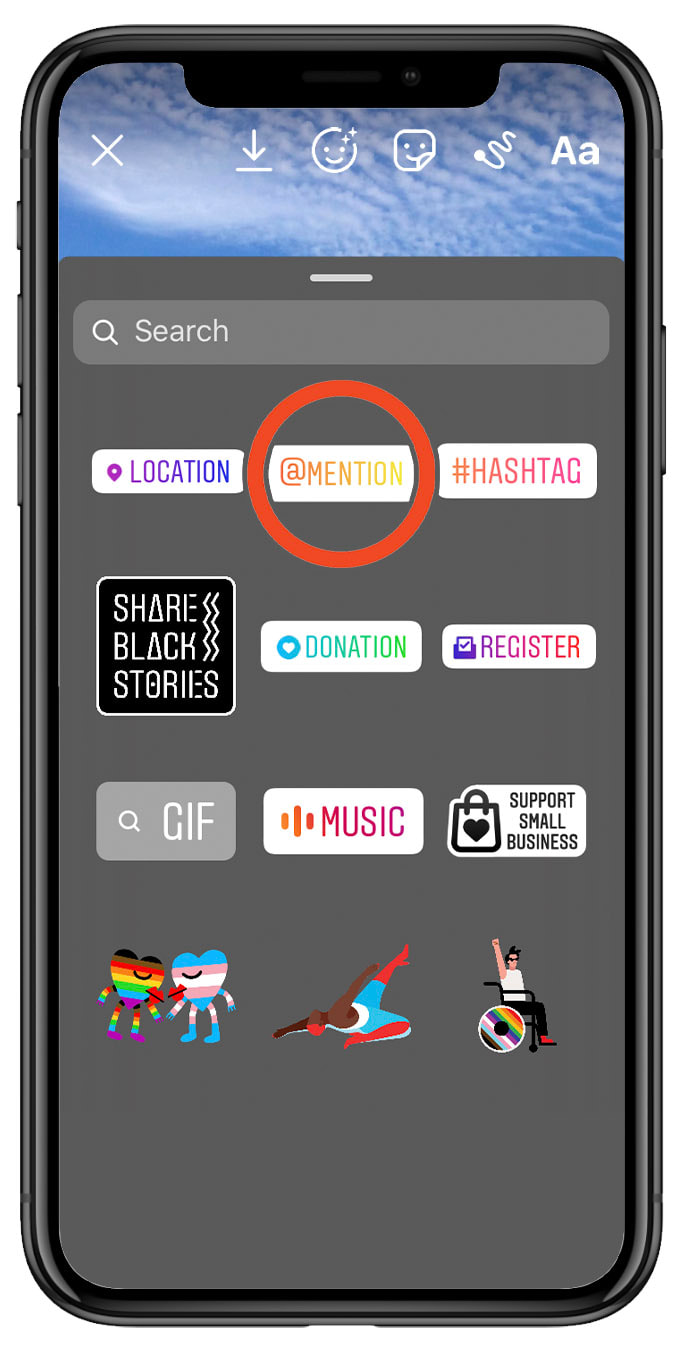
There’s a location and a hashtag sticker. There’s also a mention sticker. This sticker lets you tag someone(s) in your Story. This one won’t help you get into any public Stories, but it will give a public shoutout to the account(s) you are tagging, and just as important, it will send a notification to that account that you have tagged them in a Story.
As I always say — don’t talk about anyone on the internet if you wouldn’t want them to know. And talking about someone on social without tagging them is like talking to them on the phone without first dialing their number. Without it, they might accidentally come upon your post, but a tag all but ensures they see it!
Another reason to tag someone is that when you do so, they’ll get the option to share your Story with their followers. So you give them a shoutout, and then they help you reach new audiences. Win-Win!
Along with hoping your community shares your posts, definitely consider sharing relevant and interesting Stories from your audience that tag you. User generated content can be an amazing way to tell your brand’s story.
And, something cool about sharing other people’s stories — it’s more like a quote tweet than a retweet. Meaning you don’t just have to share their Story as is. You essentially are sharing their Story as a sticker, so you can add your own location, mention and hashtag stickers to it as well as GIFs, text and more. Have fun with it!
|
|
4. Get Engaging With StickerS
If you haven’t explored the loads of fun stickers available to you in Instagram Stories, you are missing out! Along with the ones we’ve already covered, and GIFs (which I love!), there are also some really cool engagement stickers built right into the platform.
You can use stickers to solicit questions from your audience (which you can then answer in follow up Stories), take polls, quiz your audience… there’s even a countdown clock available to you if you have an exciting event taking place and want to build some excitement.
Explore and get to engaging your audience with stickers.
5. Create Your Own StickerS
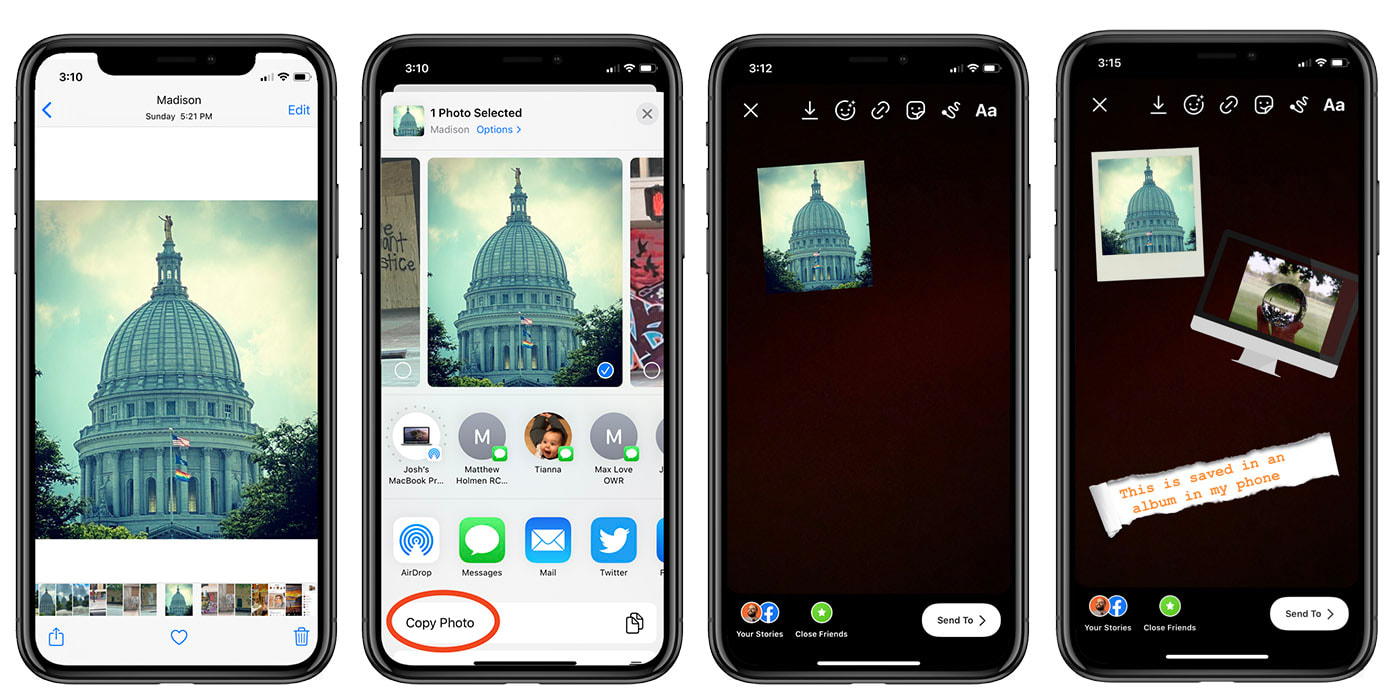
Find a photo you like. Whether it’s in your browser or saved on your phone, either will work.
In your browser, long tap the image until you see the option to save it. Once the image is saved to your photos, tap the Share button and then tap copy photo.
Now, head back to your story. The copied image should pop up in the lower left hand corner of the screen. Tap on it and bang! You’re good to go.
If you miss the pop up, don’t sweat it. Just open the keyboard, hit paste, and you’re back in business.
That was the tip—here comes the hack! You can save transparent images (.png files) like a Polaroid frame and use these as stickers too. This way, it’s easy to get really creative with a few basic building blocks. Add these in the same way you added those previous stickers, and you’re in business.
This is a super fun and interesting way to create your own content, and most importantly, to be able to do so in your own voice (and with your own colors and branding).
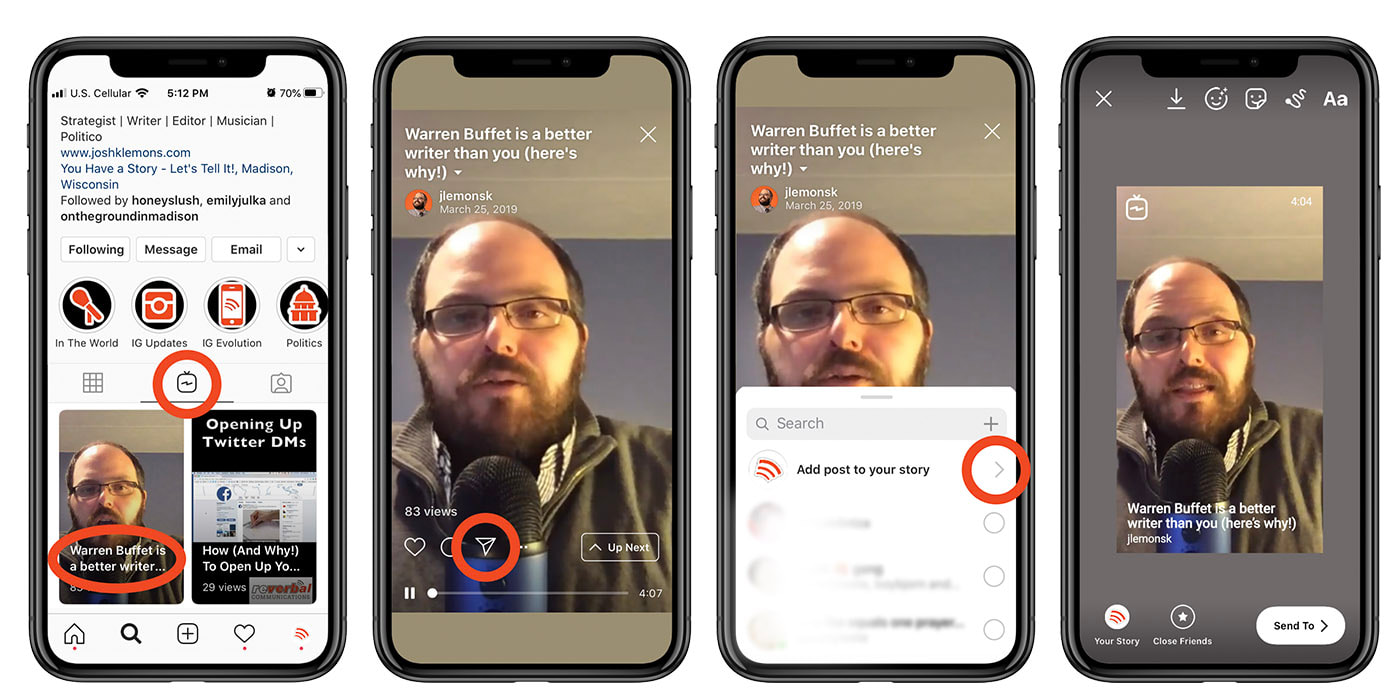
6. Add Any Instagram Post To Your Story
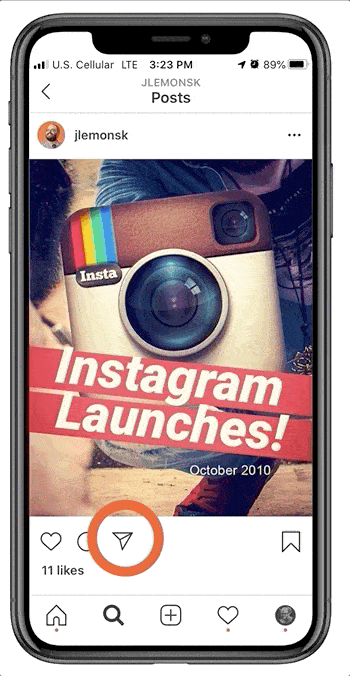
Did you know that you can add ANY public Instagram post — your own or anyone else’s — to your Stories? To do so is extremely simple: at the bottom of the post, next to the heart and comment icons, there’s a little paper airplane. Click it and you’ll see the option to “add to story.”
Click that and whatever you were looking at will appear as a sticker in your Story. When I say “whatever you were looking at,” what I mean is that if it was an album, you can only add one image, and if it’s a video, you will only be adding a screenshot of the thumbnail associated with the video.
But once you have the image in your Story, you can move it around, make it bigger or smaller and add all of the stickers, GIFs and text you want. And if you tap on the actual post, it will change the formatting from the clean image with a tag of who posted it, to an image that includes the handle and part of the post’s original text.
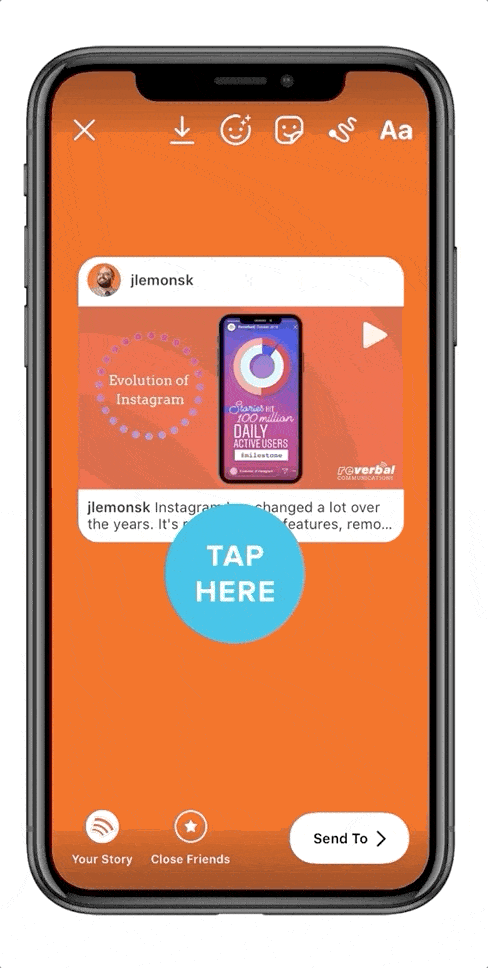
Here’s the coolest hack for this though — go to your GIF library and search “tap here.” You’ll have loads of options — pick one you like. Add your “tap here” sticker to your Story.
When someone taps it, they’ll get a seemingly magic option to visit the original post. Here’s the thing — they would get that option whether or not you point them to tap there. Most folks just don’t realize that it’s an option to click through.
The built-in call-to-action makes it super easy to drive people from your Story to your original post (or anyone else’s). It’s a big part of why more and more accounts are creating Stories from their posts. It’s a second audience you can engage around the same content, and you can potentially drive people back to the original content at the same time.
I don’t recommend doing this for every one of your posts, but definitely a helpful tool for the posts you are particularly excited about.
7. Get Creative With Color
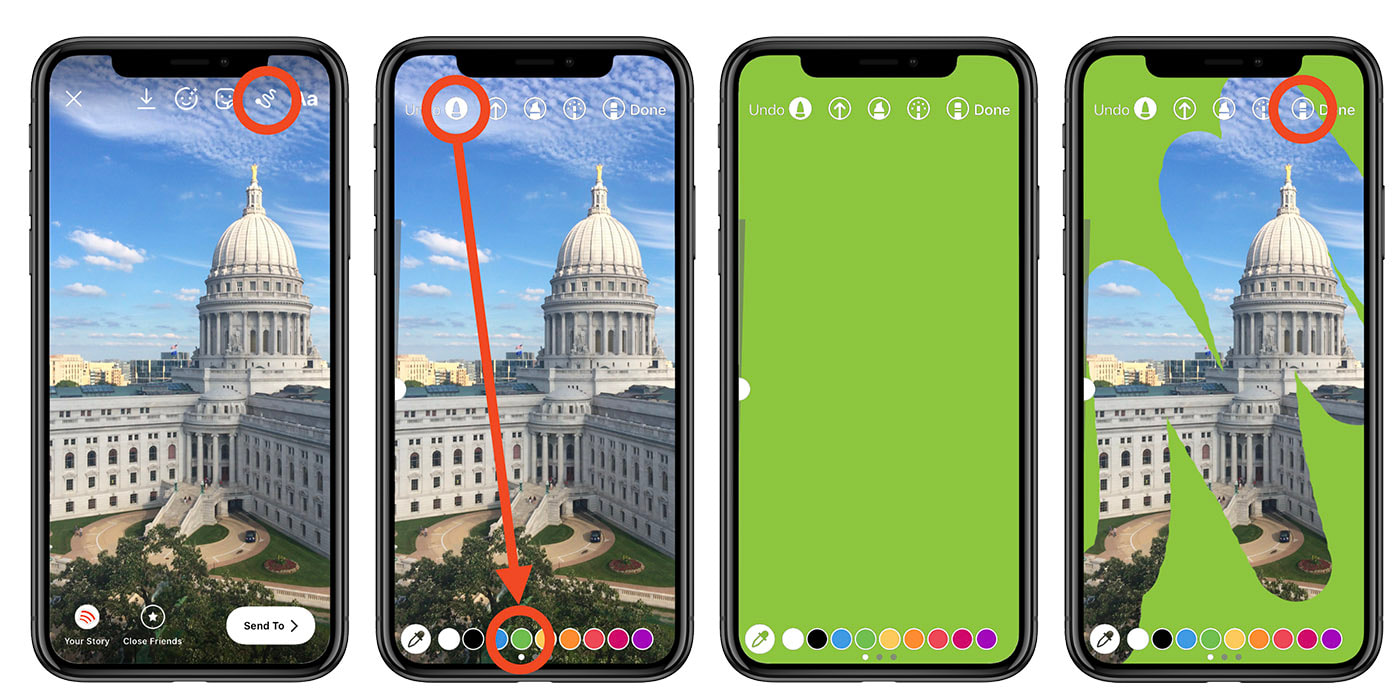
Take any picture and then tap the pen tool. Select the first pen, pick your color of choice on the bottom and then hold your finger down on the screen. The whole background will become that color.
If you want to add a transparent color over top of one of your pictures, you can do that too. Instead of selecting the first pen, select the second one, which looks more like a marker. Choose your color, hold down and you get a transparent overlay over top of your picture.
Want to get really clever with either of these — create your solid or transparent color over top of a picture, and then use the eraser to remove color from the selected areas. That can create a very cool effect!
8. Keep The Story Going With IGTV
If you have 10k+ followers, you can link a Story to an external link. This is a very powerful tool, but one that not a lot of users actually have access to.
For those of us with less than 10,000 followers, you do still have one option for linking out from your Story — you can link it to an IGTV video that you have previously posted.
IGTV, short for Instagram TV, allows you to post longer videos then you can post within Instagram proper. On Instagram, you are limited to one minute videos, but with IGTV, you can go up to 10 minutes (some bigger accounts can even go up to an hour).
It can be a great way to repurpose videos that you created elsewhere but couldn’t post to Instagram because they were too long.
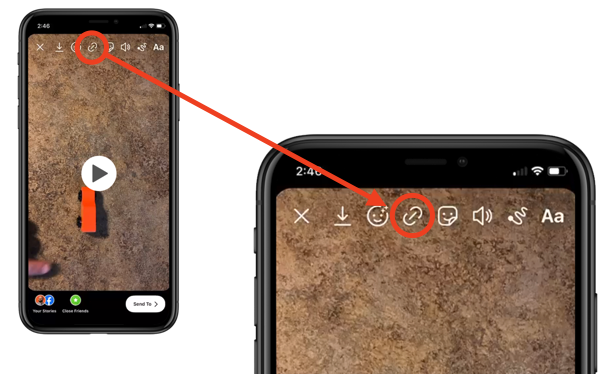
Once you have posted something to IGTV, you can link directly to the video through a Story. To do so, simply tap the link icon at the top of your story. You will then be able to select from any of your pre-published videos in IGTV. Then anyone seeing your Story can swipe up and get to your IGTV video.
Like with the “Tap Here” hack, search the GIFs library for a “Swipe Up” call-to-action. so your audience realizes that your Story is intended to take them somewhere else to continue on in the fun!
You can also share an IGTV directly to your Instagram Stories. To do so, simply select it and add it to your story like you would any public post. This will not show the entire IGTV, but will let people stream a few seconds of it and give folks an option to keep watching your full video at IGTV.
9. Make Your Own Drop ShadowS
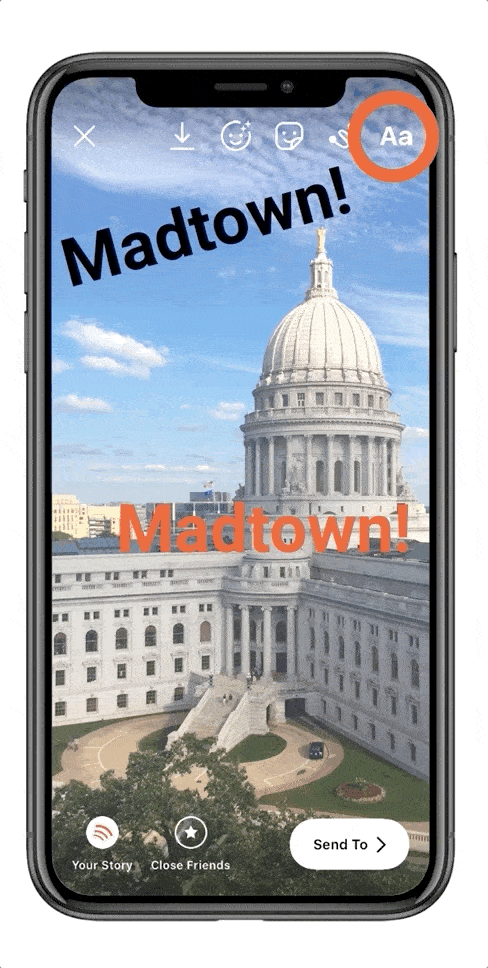
Here’s a fun hack — while Instagram recently upped their font offerings, including a drop shadow option, it’s still a bit limiting as far as customizing your retro drop shadow text look. Want to create a drop shadow effect using the colors and fonts of your choice? Doing so is really easy!
Create your text. You can change the size but doing so makes this hack a little tricky. Position it right where you want it, and then create the exact same text again, just with a different color.
Then place one of the texts on top of the other, but just slightly off, enough to create your own… wait for it… drop shadow.
Want to see an example of this in action. Head over to my Instagram account — I’m @jlemonsk — and then check out my Story highlight titled IG updates. Whenever I create a Story about a new Instagram feature, hack, or strategy, I add it to that highlight. Scroll through and you’ll find one that shows this drop shadow hack in action.
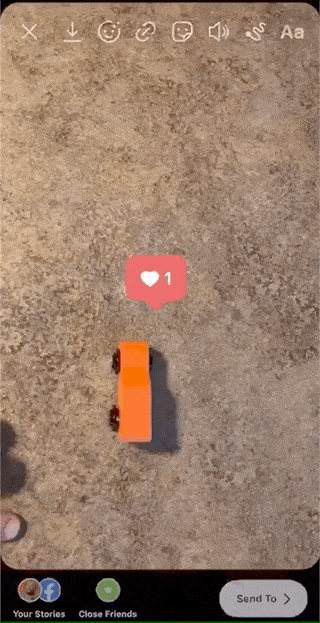
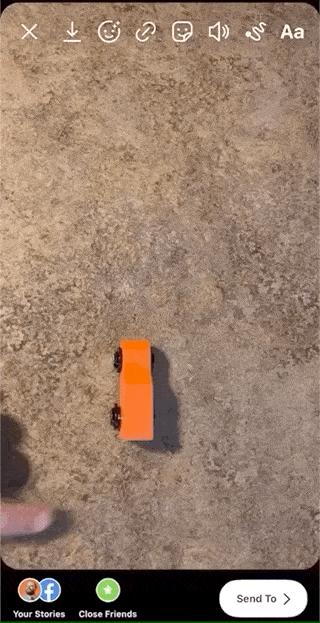
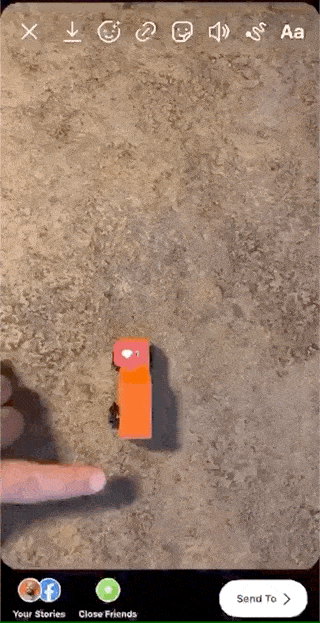
10. Put a Pin In IT
I saved this one for last because it is just so freaking awesome! Want to add a sticker, text or GIF to a video and have it follow along with the video, rather than just remaining static in one spot? Doing so is actually really easy!
Create a video Story (either take a new video in the app, or add in a video that’s already on your phone). Then, select a sticker or GIF you want, or add even text. While the video is playing in the background, long press the sticker or text.
You’ll then get a scrollbar at the bottom of the screen. That scrollbar will let you move through the video at your own speed. Scroll to a spot that lets you clearly see where you want your sticker to stay pinned. Then move/resize the sticker until you have it where you want it. Hit pin and voila. You’ve pinned your sticker, text of GIF.
|
|
|
|
This one’s a little complicated, so here’s a quick recap:
-Create a video story
-Select a sticker
-Tap and hold the sticker
-Scroll to a good spot
-Hit pin
Assuming your video isn’t too complicated for Instagram to handle, it should paste your sticker or text onto that spot in the video and then let it follow along throughout the duration of the video.
So in this example, I pinned a Like sticker to a little toy car. Let’s call it a Heart-Ford. (Fun pun to always remember the capital of Connecticut: the Heart Ford Connects a Cut 😂). Instead of the Like sticker just sitting in the corner, it zooms along with the car.
Pretty cool, right?
Bonus! Third Party Tools
Everything you’ve seen in this post can be created directly in Instagram. But if you want to take your Story game to the next level — or if you want to innovate some hacks of your own — feel free to try out some of these third-party apps.
These design tools are useful beyond Instagram, with templates and editing capabilities to make almost anything you need for your social media program.
Adobe Photoshop: The gold standard of image editing, Photoshop now has a great mobile-friendly version of the app
Adobe Spark: A browser-based editor with thousands of fun templates
Canva: Similar to Spark, Canva is a user-friendly, browser-based image editor
InShot: A powerful video editing tool with cool filters
These next 3 apps focus specifically on Stories, and each has a free or paid option, so you can take your content as far as you can imagine.
Over: Easy to edit templates for beautiful stories
Unfold: Story-editing tool with beautiful, designer-built templates
Instories: A personal favorite, this is imho the most fun story editor with dynamic and fluid titles and video frames that make your Stories look quite professional without much effort at all
Your Turn!
What are some of your favorite strategies, tricks or hacks that you have been using to step up your Instagram story game? I want to hear about them. Hit me up on Instagram (again, I’m @jlemonsk), or on Facebook, Twitter or LinkedIn where I’m Reverbal Communications.
Or… show off what you’ve learned! Make a cool Instagram Story and use the hashtag #StepUpYourSocial.
If you tag me in your Stories, you better believe I’m gonna share it! So hit me up!
Now what are you waiting for? Get out there and step up your Story game!

Leave a Reply
Want to join the discussion?Feel free to contribute!